Autocord Environmental Audio Monitor
Autocord Features
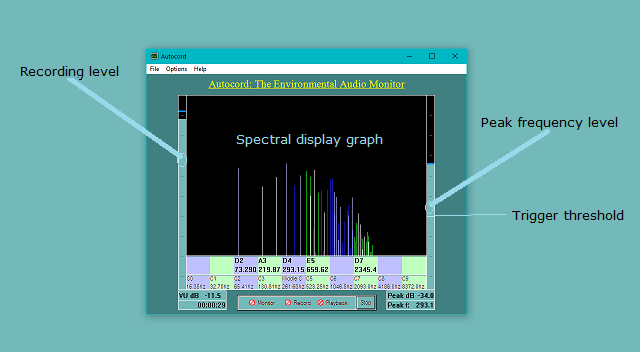
VU Meter
(Vertical bar on left) This displays the recording level. Ensure you don't drive it into the red by adjusting your mic volume level or moving the mic away from the source.
Peak Frequency Meter
(Vertical bar on right) This displays the level of the peak frequency within the selected frequency range during Monitor or Record, or the peak frequency in the full range during Play. During Monitor or Record a thin white line across this meter indicates the trigger threshold. In Record mode, when the signal level rises above the white line recording is triggered on, and when it falls below the line recording is triggered off. Trigger threshold can be set by mouse clicking within the peak meter (or from the Options menu) during Monitor or Record.
Spectral Display Graph
(Large area between the meters) This displays the peak frequencies within each octave and identifies their frequency and musical note values. Altogether frequencies spanning 10 octaves from C0 through C9, corresponding to a frequency range of approximately 16 Hz to 16,000 Hz are displayed. When in Monitor or Record modes only the peaks within the selected trigger frequency range are displayed.
The Options Menu
(At top left) Here options for File output, Recording, or the Graph may be selected.
File I/O options are:
Output: Choose between recording to mp3 to save disk space, or to wave format if further analyses of the recorded file is required.
Peak logging: The log file "Autocord.log" can grow quite large if you are continuously recording. Turn peak logging off if you are not interested in the details recorded in the log.
Limit file size: If ON, this will attempt to close the current audio file when it reaches 5 mb. A new one will be started upon the next trigger event. However, the audio file will only be closed when a triggered event has ended so as to not break in the middle of a sound of interest. If recording is continuously triggered the file will continue to grow in size indefinitely.
*Recording
*Note - the Recording Options menu item is only available when in Monitor or Record modes.
Recording options allow setting the trigger level sensitivity and trigger frequency range. (Trigger level can also be set by mouse clicking within the peak meter during Monitor or Record).
Frequencies Graph
Applies a variable rolling average to the spectral display of up to over a second of audio data. This is more of an experimental option but may be useful to identify the fundamental frequencies in a constantly changing signal such as voice. Not recommended to do averaging when recording as this will cause triggering delays.
Using Autocord
You may record or play any mp3 or wav file right out of the box, without setting any options. The trigger level is set to -60 dB by default, which means it will begin recording as soon as you speak and pause when you stop - assuming there is no background noise. To play, load an audio file, select Playback and Start. The audio will be resampled to 32K samples per second mono and you will see the frequencies displayed in the graph.
Triggered Recording
Autocord was designed to trigger recording only on sounds of interest that lie within a selected range of frequencies and reach a selected amplitude.
Suppose for example you wish to record the songs of birds that frequent a tree outside your window. You would place your microphone in the window, put Autocord in Monitor mode, and observe the audio spectrum while the birds are singing, paying particular attention to the frequency displayed next to "Peak f:".
Suppose the frequencies observed tend to range around 2000 Hz. Then select a frequency range of perhaps from 1000 Hz to 5000 Hz and verify you are seeing the bulk of the bird sounds within this range in the spectral display. Next set the trigger level just above the ambient level when there are no bird sounds. If you are in a normally quiet area, the ambient level will be well below -65 dB. There would be no point in setting the trigger below this because the recorded sounds will be too low to be clearly audible.
Then leave for work or leave Autocord running all night while you sleep to catch the dawn chorus performed by the birds. Later you will hear the bird calls you captured in your recording and see the record in the log file of exactly what frequencies triggered recording and what the level was. From this record you can refine the process.
There are endless uses for Autocord. Just leave Autocord run all day while you are at work or all night while you sleep with trigger level set above the ambient noise level and a broad frequency range selected.
Specifically, you are not likely to have much interest in sounds below 150 Hz. This is where often there is a high noise level from cars passing through the neighbourhood and other sources so at a minimum set the low end of the frequency range to that. Similarly, there are not likely going to be any sounds above 10,000 Hz so set the upper limit to that. Finally, assuming the ambient noise is well below -65 dB, set the trigger threshold no lower than this as any sounds recorded below that may be nearly inaudible. When you return, listen to the sounds that you captured. You may capture all kinds of strange sounds and have fun trying to identify them.
You can identify from the log exactly when each triggering event occurred and its offset from the beginning of the recording. Of course you may use any software to play back the audio. If you are doing serious research I would recommend at least using Audacity or similar audio editor and sounds recorded in wav format. In Audacity you can see the time/sample offset of a given sound, normalize the volume level or run frequency analysis from there.